Showing posts with label 2009 Fall Festival. Show all posts

Saturday, October 24, 2009

Winner of the Beibi Shoes Giveaway

Sorry I'm late posting this, I've been out of town!

Comment #62: Cara W.

Congratulations! Winner has 48 hours to respond to my email!


The Beibi Shoes Giveaway concludes the Fall Festival giveaways! Thank you for everyone participating in my Fall Festival! I have lots of reviews & giveaways coming up this week, it's just the matter of me having the time to put them up. I have two HUGE giveaways starting November 1st and lasting until November 30th. You can read here about the extra entry opportunity for the Bei Bambini clothes giveaway valued over $500!
Photobucket

Wednesday, October 21, 2009

Winner of the Plucky Pear Designs!


Congratulations! Winner has 48 hours to respond to my email!

Photobucket


MyFreeCopyright.com Registered & Protected

Sunday, October 18, 2009

Decorate a Halloween Gingerbread House

This is part three of a three part series on making your own Halloween Gingerbread House.
You can read the first & second part here: 
Bake your own Halloween Gingerbread House
Put Together a Halloween Gingerbread House 

Finally the fun part, decorating your Halloween Gingerbread House! I invited a few of my family members over to partake in the Halloween fun. My nephew and two nieces decorated their own houses. 

I threw together a few things to make it a festive little party for us. 

*Click on photos to enlarge*

The table.


I made chocolate cupcakes with bright green vanilla cream frosting. I got these cute cupcake holders and picks made by Wilton at Target.


Green punch! I made up my own recipe: Lemon-Lime Kool-aid mixed according to directions with about 1/2 packet of the Kool-Aid Pina-Coloda flavor mixed into it. Then added about 3/4 of a 2 liter bottle of ginger-ale. It was very good, not too sweet and not too sour, perfect with all the candy and cupcakes we had!


Look at all that candy!


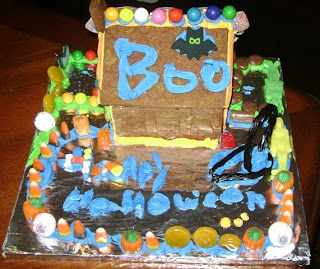
Now the finished houses!

My nephews. 


My nieces.


Me and Ethan's (I'm talking during the picture, yeah, not flattering!)


Photobucket


MyFreeCopyright.com Registered & Protected

Saturday, October 17, 2009

Put Together a Halloween Gingerbread House

This is part two of a three part series on making your own Halloween Gingerbread House.
You can read the first part here: 
Bake your own Halloween Gingerbread House


You will want to bake your gingerbread houses a couple of days in advanced so they will dry hard. I typically lay them on a drying rack and cover with a paper towel. It is best to glue the houses together a day in advanced or at least several hours before you decorate. When you glue the houses together with royal icing you will want to make sure you give it enough time to thoroughly dry since you use a lot of icing to glue it together.

I use Wilton's Royal Icing Recipe for the glue. I like this recipe because you use Wilton's Meringue Powder 
instead of egg whites. I ended up making two batches of royal icing. First I made a batch of orange colored royal icing to glue the houses together. We used it for decorating since I still had about half of it left and then I made another batch of royal icing to make green, blue and purple colored icing. Wilton Icing Colors were used to color the icing. Halloween colors are pretty bright so you have to use quite a bit of color to get it to a bright shade. This was especially true with the orange as I used about 1/3 of a container.

After you mix your colors you need to put them into icing decorating bags or ziplock bags right away. Royal icing dries super quick. If you need to buy some time you can cover it with a damp paper towel. I used my icing decorating bags and tips because there were only a couple of us decorating. If you are having a large party just put icing into individual ziplock bags. What is great about putting the royal icing into ziplock bags is that you can make it ahead of time then store it in the refrigerator and clip the end off with scissors when it's time to decorate.
                                                                                                                   *click on photos to enlarge*

Now to the construction of the gingerbread house. First of all you will need a sturdy board of some type. My husband is a home builder so he can get me scraps and it doesn't cost me anything. You probably could use cardboard, but a heavy base I think is the best option.

Next, you will need to cover the board with foil.


Start by gluing a couple of pieces together. Use LOTS of icing, don't skimp! You don't want it falling apart especially while someone is decorating it or when they take it home! Use lots of icing on the inside part since it won't be seen.


Then glue on roof and chimney. I know it looks messy, but it is very difficult to do this neatly. This is the first one I glued today too, so the first one is always the worst looking.


Now you are ready for your party! Next post: Halloween Gingerbread House Decorating Party!


Photobucket


MyFreeCopyright.com Registered & Protected

Winner of the SnugglePants


Congratulations! You have 48 hours to respond to my email!


Photobucket

Friday, October 16, 2009

Bake your own Halloween Gingerbread House

This is part one of a three part series on making your own Halloween Gingerbread House.
You can read the second & third part here: 
Put Together a Halloween Gingerbread House 
Decorate a Halloween Gingerbread House


Last year at Christmas I begin a tradition of baking and decorating our own Gingerbread House and made it into a party to invite some friends and family as well. It was so much fun! I opened up my first blog just for the annual tradition, you can read it here. Since it was my first blog, it's nothing fancy, I haven't added anything to it since then, but I will be updating it more this year. I bought an actual gingerbread mold so I thought I would try it out and make a Halloween Gingerbread House. I have invited just a few of my family members to come over and join in the Halloween fun.

Last year at Christmas I downloaded a template online and cut out my pieces with a knife. It didn't work too well because all the pieces were different thickness and once I moved them to the cookie sheet they were not straight. You can imagine what it's like trying to glue that together! The last few months I've been looking on eBay for various templates. I ended up buying a cast iron mold by John Wright. It is a two sided template. One side is a traditional log cabin style and the other a victorian style house. The only thing that stinks about it is you have to cook one side twice for one house. I'll be adding more molds to my collection to help speed up my baking time!
*You can click on the photo to see larger*


I started out with the same recipe I used last year since I really liked the flavor. I made one batch at first thinking that I was able to make two houses. I made 3 houses for decorating so I also made one batch of dough out of the John Wright pamphlet since it said it made one house. I ended up with way to much dough! I could have used just the recipe I used from last year and had more than enough for these 3 houses.

I am going to share with you the recipe out of the John Wright pamphlet. This dough is lighter in color and the flavor is not as strong either.

1/2 cup shortening
1/2 cup granulated sugar
1/2 cup dark molasses
2 tablespoons cold water (I ended up using much more)
3 cups all-purpose flour
1 teaspoon ground ginger
1 teaspoon ground cinnamon
1/2 teaspoon salt

Cream together shortening, sugar, molasses and water. Sift together flour, spices and salt. Add dry ingredients to shortening mixture and mix well. Dough will be stiff. Chill at least 1 hour. Grease or spray mold with vegetable stray. Press dough into the mold. Bake in pre-heated 350 degree oven for 25 minutes. Let gingerbread cool in the mold for 10 minutes. Carefully remove each piece of gingerbread to cooling rack, flat side down. Repeat with other side, front, roof and chimney.


I section out a piece then roll it out on a floured large wooden cutting board. Drape it over the mold and press in and remove all the extra dough. It was so much easier than trying to cut around a paper template!

Here it is after it's baked. Can you smell it??


Next post, gluing the house together!
Photobucket

MyFreeCopyright.com Registered & Protected

Wednesday, October 14, 2009

Winner of the Christopher Bean Coffee Giveaway

Winner of the Christopher Bean Coffee Giveaway! Congratulations, you have 48 hours to respond to my email!


I am leaving the coupon code up for the Christopher Bean Coffee discount. It is good for a year!

Photobucket

MyFreeCopyright.com Registered & Protected

Friday, October 9, 2009

Beibi Shoes Review & Giveaway

~~~THIS GIVEAWAY HAS ENDED~~~


Time for new shoes?

Since Ethan is trying to walk now we thought it would be a good time to find some good sturdy shoes for his little feet. Also since the weather is getting colder, he needs shoes to keep his feet warm too! There are lots of choices for baby and toddler shoes out there, but it's important to find a good quality shoe when they start walking. I recently came across Beibi shoes online and loved the wide variety of styles and the quality of their shoes.

Who is Beibi Shoes?
Beibi Shoes are by the same maker of WeeSqueak, the adorable little shoes with a squeaker. They discovered these shoes while in China adopting their daughters. Check out their About Us page to see the pictures of their beautiful little girls!

Ethan's Beibi Shoes Experience...
Ethan received the Crawford Brown Baby Shoe. Such a cute fall shoe with the little touch of orange! The construction of the shoe is excellent. The soles of the shoes are very flexible which is important as a baby is learning to walk. I really liked the fact that this pair of shoes had no laces to tie. The top strap is velcro and it was very easy to undo and open it wide enough to put his foot in. They were so quick to put on since it opened up wide enough. I can't think of anything more frustrating than a baby shoe not opening wide enough to get their feet in. Ethan seemed to enjoy his new pair of shoes and walked along the sides of all the furniture just fine (we're still working on the walking part). I think these shoes will hold up nicely over the fall and winter.

Why you should choose Beibi Shoes...

  • Excellent quality
  • Wide variety of cute, stylish designs
  • Flexible soles perfect for the baby on the move
  • Donates 5% of their profits to Half the Sky and to The Leukemia & Lymphoma Society
  • Can be purchased online or at your local retail shoe store.


BUY IT! You can purchase Beibi Shoes from their website or check to see where the closest retailer is located.


WIN IT! Beibi Shoes is giving away winner's choice of one pair of Girl or Boy Beibi Shoes!


I am now using this easy to use document for entries here on Take Time to Smell the Rose. I am hoping that it will be easier for my readers to enter my giveaways and not accidentally skip over an extra entry they qualified for. Each counts as 1 entry unless otherwise specified.

INSTRUCTIONS FOR ADDITIONAL TWEETS: You are still allowed to do 2 tweets a day per giveaway. For additional tweets you will have to fill out the required top questions then SKIP all other questions to the very bottom of the form. At the bottom of the form is where you fill in your additional daily tweets.

Giveaway ends Friday, October 23, 2009 at 9:00 p.m.(CST) Winner will be drawn by the random number generator at Random.org and will be notified by email. Winner will also be announced on this blog. Winner will have 48 hours to respond or a new winner will be drawn.

This giveaway is open to USA residents ONLY . Must be 18 years old or older to win.

Thank you Beibi Shoes  for sponsoring this review & giveaway!  

MyFreeCopyright.com Registered & Protected

~~~THIS GIVEAWAY HAS ENDED~~~

Wednesday, October 7, 2009

Winner of the AnytimeCostumes.com Giveaway!


Congratulations! Winner has 48 hours to respond to my email.


Photobucket

MyFreeCopyright.com Registered & Protected

Plucky Pear Designs Review & Giveaway

***THIS GIVEAWAY HAS ENDED***


Do you digi-scrap?
Digital Scrapbooking is really popular. I never got involved with the traditional scrapbooking, I did do one scrapbook back in 2001 for my vacation to France & Germany, but that was it. Digi-scraping has been much more fun and had more perks than traditional scrapbooking with paper products. I started digi-scrapping right before Ethan was born. My first projects were creating his birth announcements. We didn't know the gender until he was born, so I made at least 3 different designs each for a boy or girl. Then after he was born I just plugged in his photo and stats and had prints made. I have scrapped all of my pregnancy photos and all my favorite photos since he was born. Thank goodness I had them all loaded up on my facebook page otherwise they would all be gone, thanks to my computer hard drive going out! I still need to scrap his birthday photos and then I'm ready to have his "First Year" bound into a photo book.

Why I digi-scrap...
  • Nothing to drag out and make a big mess! It's all on the computer. If you only have 10 minutes to scrap you can get a page or two done, turn off your computer and you are finished. Those who paper scrapbook have to dedicate at least a day to make it worth their while.
  •  You can make your own beautiful customizable birthday invitations, baby announcements, party invites, Christmas cards, etc to save money and have it look exactly how you want it. I make all my party announcements. I will be sharing these along the way. I also made the cupcake toppers to Ethan's First Birthday along with his birthday invitation and the Thank You card on the mints. The sky is the limit with what you can create.
  • You can make your blog prettier :-) Just about everything you see here including all my buttons I have made myself!
  • You can email these photos to friends or family.
  • You can create your own photo books or scrapbooks without using premade templates. One place you can create your own photo book with your digiscrapped pages is at  Blurb.com
  • SAVE MONEY! There is a ton of freebies online, but there also a ton of kits for purchase in just about any theme you can think of.
  • SAVE TIME! You can also save time because you aren't spending the time to go shopping for papers or embellishments at a store or wait from them to be shipped if you purchased them online. When you digi-scrap you purchase it online and then download it immediately, no waiting!
How do I digi-scrap?
The program I use is Memory Mixer it is very simple to use. If you have Photoshop you can use that. Photoshop is expensive, so if you don't have it you can download a free program online that is just like it, Paint. There are a few free scrapbook programs out there as well such as ScrapbookFlair. I don't have experience with any of the free programs so I can't tell you anything about them. I love my Memory Mixer because it is fast and easy to use so any questions you have about that I can answer.

Who is Plucky Pear Designs?
Plucky Pear Designs is a new digital scrapbooking store that just opened in June 2009 by Rachael & Kelly. They have some adorable stuff and it's exciting to see what else they will come out with next. A little info about them:

             We first got to know each other as designer and CT member in the spring of 2008. We quickly           
             became friends. In June of 2009 we decided to do a collab together. Thus came Safari Stampede, an 
             adorable and fun kit that can be used in so many fun layouts. Because of the success of this kit and 
             our growing friendship we have decided that we wanted to form a dynamic duo. We will still be 
             designing on our own, but have joined together to become Plucky Pear Designs. Why plucky pear? 
             because we are a spunky, spirited pair of ladies. We have found ourselves a new home for our 
             designs and hope that you love creating with them as much as we do making them!

My scrapping experience with Plucky Pear Designs!

I was so happy when Plucky Pear Designs sent me their Autumn Hues from Creations by Rachael. The preview picture only shows some of what you get in the kit. This kit is so beautiful!
Here's what comes in the kit:
Kit Includes
23 Papers
72 Elements

Elements Include
3 acorns
1 bead scatter
2 bows
5 branches
4 buttons
1 dragonfly
1 fabric strip
3 fasteners
1 fence
7 flowers
4 frames
12 leaves
2 mats
6 nature elements
1 raffia
6 ribbons
1 hay ride wagon
1 sign
4 tags
1 thread
3 trees
2 twine
1 wire mesh

Shadows for previews only.
All elements not always shown.
S4H Friendly

First thing I made was my my blog button for my Fall Festival! Of course you've already seen it...but here it is again :-)
Photobucket

I also scrapped a few pictures from the past week. I probably didn't even use 25% of all the paper and elements just in these 4 items. Click on each picture to see it in larger detail.


I am really impressed with the excellent detail and variety of the Autumn Hues kit. This is the most beautiful fall kit I have seen out there. I look forward to using it on the rest of our fall photos of the season.


BUY IT! You can purchase the Autumn Hues kit directly from Plucky Pear Designs website.


WIN IT! Plucky Pear Designs is giving away one download of the Autumn Hues from Creations by Rachael kit!


You have the chance to enter several entries by the doing the following. Each one counts as 1 entry unless otherwise specified.
  • MANDATORY ENTRY-counts as 1: Go to Plucky Pear Designs and what other kit you would like to have.
  • Follow my blog publicly. THIS COUNTS AS 5 ENTRIES! Comment separately as "I follow your blog publicly #1", etc.
  • Subscribe to my blog via email with Feedburner (on right side bar). Counts as 2 entries!
  • Blog about my giveaway before October 16th, linking back to this giveaway. Leave the URL where you blogged.
  • Grab my  Take Time to Smell the Rose button. Leave URL where it is posted.
  • Grab my Take Time to Share Your Giveaway Sunday button. Leave URL where it is posted.
  • Grab my Fall Festival button. Leave URL where it is posted.
  • Follow Smell_the_Rose on Twitter and tweet about this giveaway. After initial "tweet" you may gain 2 extra entries each day per tweet. Limit TWO tweets a day. Leave URL where you tweeted in your comment.
  • Follow Plucky Pear Designs on Twitter.
  • Become a fan of Take Time to Smell the Rose on Facebook.
  • Become a fan of Plucky Pear Designs on Facebook.
  • Subscribe to Plucky Pear Designs Newsletter.
  • Enter one of my other current giveaways and comment which one. You may earn one entry for each current giveaway you enter.
  • Make a purchase from Plucky Pear Designs between Oct 7 and Oct 21.
  • Vote for me at the Top Mommy Blogger by clicking here Vote must be a new vote placed between Oct 7 and Oct 21. The vote will only count for this review  giveaway. COUNTS AS 2 ENTRIES. Comment separately as "Voted for you on Top Mommy Blogger #1" and "Voted for you on Top Mommy Blogger #2"


    Be sure to read this post on how you can earn extra entries on the last review & giveaway! If you have earned extra entries, you must enter them in yourself at each giveaway.


**Leave your email on each comment. You must do this in order to win!**

Giveaway ends Wednesday, October 21, 2009 at 9:00 p.m.(CST) Winner will be drawn by the random number generator at Random.org and will be notified by email. Winner will also be announced on this blog. Winner will have 48 hours to respond or a new winner will be drawn.

This giveaway is open to USA residents ONLY . Must be 18 years old or older to win.

Thank you Plucky Pear Designs for sponsoring this review & giveaway!  


Photobucket


MyFreeCopyright.com Registered & Protected

***THIS GIVEAWAY HAS ENDED***

LinkWithin

Related Posts with Thumbnails